Unity如何實現簡單虛擬搖桿
小編這次要給大家分享的是Unity如何實現簡單虛擬搖桿,文章內容豐富,感興趣的小伙伴可以來了解一下,希望大家閱讀完這篇文章之后能夠有所收獲。
創新互聯專注于企業全網營銷推廣、網站重做改版、大姚網站定制設計、自適應品牌網站建設、H5網站設計、商城網站制作、集團公司官網建設、成都外貿網站制作、高端網站制作、響應式網頁設計等建站業務,價格優惠性價比高,為大姚等各大城市提供網站開發制作服務。
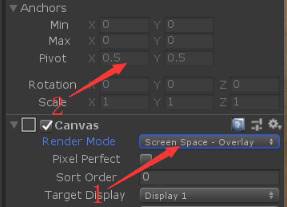
最近一直在倒騰用UGUI做虛擬搖桿,網上普遍的的做法就是使用以下的代碼,但是這個有些注意事項,第一點就是Canvas的Render Mode必須是Screen Space Overlay,第二點就是掛載這個腳本的錨點的x,y必須是0.5,如圖下:
using UnityEngine;
using UnityEngine.EventSystems;
public class JoyStick : MonoBehaviour, IDragHandler, IEndDragHandler
{
 Transform point;
 Vector3 startPos;//開始位置
 Vector3 dir;//方向
 float radius = 0;//需要移動的半徑
 void Start()
 {
 point = transform.GetChild(0);
 radius = (transform as RectTransform).sizeDelta.x * 0.5f;
 startPos = point.position;
 }
 public void OnDrag(PointerEventData eventData)
 {
 point.position = eventData.position;
 dir = (point.position - startPos).normalized;
 if (Vector3.SqrMagnitude(point.position - startPos) > radius * radius)
 point.position = startPos + dir * radius;
 }
 public void OnEndDrag(PointerEventData eventData)
 {
 point.localPosition = Vector3.zero;
 }
}
如果Canvas的Render Mode是Screen Space Camera,這樣的話上面的代碼是不能滿足要求的,花了一點時間才發現是這個原因,導致上面的代碼不適用的,最后把代碼重寫了一下,終于可以成功了!
public class JoyStick : MonoBehaviour, IDragEvent
{
 private Canvas canvas;
 private RectTransform rectTransform;//坐標
 private static Quaternion amendAngle;
 private static float mRadius = 0,v=0, h=0;
 private static Transform point;
 private static Vector3 initPos;
 private static Vector2 startPos;
 private void Start()
 {
 point = transform.GetChild(0);
 canvas = GameObject.Find("UIRoot").GetComponent<Canvas>();
 rectTransform = transform as RectTransform; //也可以寫成this.GetComponent<RectTransform>(),但是不建議;
 mRadius = (transform as RectTransform).sizeDelta.x * 0.5f;
 initPos = point.localPosition;
 h = v = 0;
 }

 public void OnBeginDrag(PointerEventData eventData)
 {
 RectTransformUtility.ScreenPointToLocalPointInRectangle(rectTransform, eventData.position, canvas.worldCamera, out startPos);
 startPos = eventData.position - startPos;
 h = v = 0;
 }

 public void OnDrag(PointerEventData eventData)
 {
 point.localPosition = eventData.position - startPos;
 Vector3 dir = (point.localPosition - initPos).normalized;
 v = dir.normalized.x; h = dir.normalized.y;
 if (Vector3.SqrMagnitude(point.localPosition - initPos) > mRadius * mRadius)
 point.localPosition = initPos + dir * mRadius;
 }

 public void OnEndDrag(PointerEventData eventData)
 {
 point.localPosition = Vector3.zero;
 h = v = 0;
 }
}
RectTransformUtility.ScreenPointToLocalPointInRectangle(rectTransform, eventData.position, canvas.worldCamera, out startPos)這個的startPos返回的是點擊屏幕的坐標,rectTransform是這個腳本掛載物體上的RectTransform的組件,然后減去eventData.position就知道坐標的偏移值了,看一下代碼應該都可以了解意思,這里就不過多的解釋了。
看完這篇關于Unity如何實現簡單虛擬搖桿的文章,如果覺得文章內容寫得不錯的話,可以把它分享出去給更多人看到。
當前文章:Unity如何實現簡單虛擬搖桿
文章出自:http://m.newbst.com/article24/jesdce.html
成都網站建設公司_創新互聯,為您提供做網站、品牌網站建設、網頁設計公司、響應式網站、App設計、域名注冊
聲明:本網站發布的內容(圖片、視頻和文字)以用戶投稿、用戶轉載內容為主,如果涉及侵權請盡快告知,我們將會在第一時間刪除。文章觀點不代表本網站立場,如需處理請聯系客服。電話:028-86922220;郵箱:631063699@qq.com。內容未經允許不得轉載,或轉載時需注明來源: 創新互聯

- 移動互聯網時代建設移動網站策劃該怎么做? 2022-11-29
- 企業建站前要做好哪些網站策劃? 2021-06-20
- 企業網站建設方案策劃書如何寫?企業網站策劃書 2022-08-26
- 普陀網站策劃方案需要考慮哪些方面? 2020-11-15
- 都江堰創新互聯:什么是網站策劃? 2022-07-11
- 網站策劃之如何提高用戶參與度-評論篇 2015-08-02
- 網站策劃機構議校園網站的意義 2022-12-08
- 淺析網站策劃方案的七大步驟 2016-10-20
- 如何重塑企業品牌網站?專業的網站策劃公司可以幫助 2022-07-16
- 網站策劃方案書需要涉及哪些內容 2015-10-21
- 好的網站建設精準的網站策劃流程 2022-08-08
- 網站建設之網站策劃 2023-02-09