Centos7下Gitlab遷移數據庫mysql過程
第1章 系統準備
[root@test ~]# cat /etc/redhat-release
CentOS Linux release 7.2.1511 (Core)
[root@test ~]# uname -r
3.10.0-327.el7.x86_64
我們提供的服務有:成都做網站、網站制作、微信公眾號開發、網站優化、網站認證、淶源ssl等。為1000+企事業單位解決了網站和推廣的問題。提供周到的售前咨詢和貼心的售后服務,是有科學管理、有技術的淶源網站制作公司
1.1添加阿里云的鏡像
cd /etc/yum.repos.d
#備份原鏡像
mv CentOS-Base.repo CentOS-Base.repo.backup

#添加阿里云Base源
wget -O /etc/yum.repos.d/CentOS-Base.repo http://mirrors.aliyun.com/repo/Centos-7.repo

#添加阿里云epel源
wget https://mirrors.aliyun.com/repo/epel-7.repo
#清除緩存
yum clean all && yum makecache
第2章 yum安裝最新版Gitlab9.1.2
2.1安裝依賴軟件
yum install curl policycoreutils openssh-serveropenssh-clients
2.2添加清華大學鏡像
vi /etc/yum.repos.d/gitlab-ce.repo
[gitlab-ce]
name=Gitlab CE Repository
baseurl=https://mirrors.tuna.tsinghua.edu.cn/gitlab-ce/yum/el$releasever/
gpgcheck=0
enabled=1
2.3安裝gitlab-ce
yum makecache
yum install gitlab-ce
2.4查看安裝gitlab的版本
head -1 /opt/gitlab/version-manifest.txt
gitlab-ce 9.1.2
2.5重新配置并啟動Gitlab
# gitlab-ctl reconfigure會把一些過去的config還原,導致修改的端口以及域名等都沒有了
gitlab-ctl reconfigure

#重啟gitlab-ce
gitlab-ctl restart
第3章 安裝MySQL5.6.36
3.1添加mysql源
vi /etc/yum.repo.d/mysql.repo
[mysql56-community]
name=MySQL 5.6 Community Server
baseurl=http://repo.mysql.com/yum/mysql-5.6-community/el/7/$basearch/
enabled=1
gpgcheck=0
3.2mysql配置
yum -y install mysql-server mysql-devel

#基本配置,新建密碼等
mysql_secure_installation

#登錄數據庫
mysql -uroot -p$password

#查看用戶情況
mysql> select user,host from mysql.user;
+------+-----------+
| user | host     |
+------+-----------+
| root | 127.0.0.1 |
| root | ::1      |
| root | localhost |
| root | test     |
+------+-----------+
4 rows in set (0.03 sec)

#創建一個gitlab管理用戶
mysql> CREATE USER 'git'@'localhost' IDENTIFIED BY '123456';
Query OK, 0 rows affected (0.00 sec)

#創建gitlab數據庫
mysql> CREATE DATABASE IF NOT EXISTS`gitlabhq_production` DEFAULT CHARACTER SET `utf8` COLLATE `utf8_general_ci`;
Query OK, 1 row affected (0.00 sec)

#授予git用戶對gitlabhq_production數據庫所有表的權限
mysql> GRANT SELECT, INSERT, UPDATE, DELETE,CREATE, CREATE TEMPORARY TABLES, DROP, INDEX, ALTER, LOCK TABLES, REFERENCES ON`gitlabhq_production`.* TO 'git'@'localhost';
Query OK, 0 rows affected (0.00 sec)

#使修改用戶生效
mysql> flush privileges;
Query OK, 0 rows affected (0.00 sec)
mysql> \q
Bye

#測試新用戶是否能連接新的數據庫
sudo -u git -H mysql -u git -p -Dgitlabhq_production
Enter password:
Reading table information for completion of tableand column names
You can turn off this feature to get a quickerstartup with -A

Welcome to the MySQL monitor.  Commands end with ; or \g.
Your MySQL connection id is 32
Server version: 5.6.36 MySQL Community Server (GPL)

Copyright (c) 2000, 2017, Oracle and/or itsaffiliates. All rights reserved.

Oracle is a registered trademark of OracleCorporation and/or its
affiliates. Other names may be trademarks of theirrespective
owners.

Type 'help;' or '\h' for help. Type '\c' to clearthe current input statement.

mysql>
第4章 配置Gitlab連接mysql
4.1修改/etc/gitlab/gitlab.rb
postgresql['enable'] = false
gitlab_rails['db_adapter'] = 'mysql2'
gitlab_rails['db_encoding'] = 'utf8'
gitlab_rails['db_host'] = '127.0.0.1'
gitlab_rails['db_port'] = '3306'
gitlab_rails['db_username'] = 'git'
gitlab_rails['db_password'] = '123456'
按官方文檔重新配置gitlab
gitlab-ctl reconfigure
遷移數據庫時出現以下錯誤

第5章 排錯步驟
5.1更換gem源
#查看gem源
/opt/gitlab/embedded/bin/gem source
*** CURRENT SOURCES ***

https://rubygems.org/

#更換開源中國的gem源,否則使用時會出現錯誤
/opt/gitlab/embedded/bin/gem sources --addhttps://gems.ruby-china.org/ --remove https://rubygems.org/

#查看更好后的gem源
/opt/gitlab/embedded/bin/gem sources
*** CURRENT SOURCES ***

https://gems.ruby-china.org/

#更改配置Gemfile文件的gem源
vi /opt/gitlab/embedded/service/gitlab-rails/ Gemfile
source 'https://gems.ruby-china.org'
5.2bundle install安裝更新
#此命令會嘗試更新系統中已存在的gem包
/opt/gitlab/embedded/bin/bundle install

#執行該命令需要切換到Gemfile上一級目錄才可以運行
cd /opt/gitlab/embedded/service/gitlab-rails/
/opt/gitlab/embedded/bin/bundle install
5.3bundle禁止使用postgresql
vi/opt/gitlab/embedded/service/gitlab-rails/.bundle/config

5.4 安裝mysql2 “0.3.20”
gitlab-rake gitlab:check

#安裝mysql2 0.3.20版本
/opt/gitlab/embedded/bin/gem install mysql2 -v'0.3.20'
出錯

查看文件后發現沒有安裝gcc軟件,導致不能編譯文件。
故需要yum安裝gcc
yum install gcc –y

/opt/gitlab/embedded/bin/gem install mysql2 -v'0.3.20'
Building native extensions.  This could take a while...
Successfully installed mysql2-0.3.20
Parsing documentation for mysql2-0.3.20
Installing ri documentation for mysql2-0.3.20
Done installing documentation for mysql2 after 1seconds
1 gem installed
5.5重置檢查
#重新配置
gitlab-ctl reconfigure
#檢查
gitlab-rake gitlab:check

5.6客戶端測試
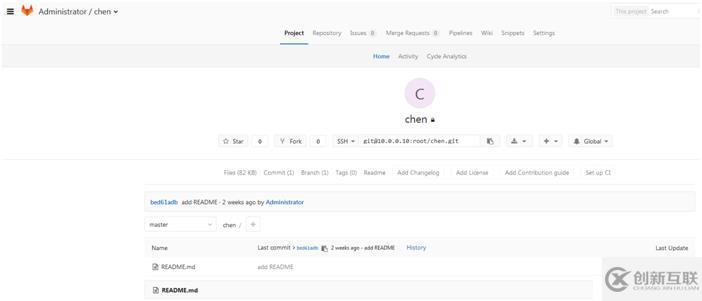
[root@test chen]# touch README.md
[root@test chen]# git add README.md
[root@test chen]# git commit -m "addREADME"
[master(根提交) bed61ad] addREADME
 1 filechanged, 0 insertions(+), 0 deletions(-)
 create mode100644 README.md
[root@test chen]# git push -u origin master
Counting objects: 3, done.
Writing objects: 100% (3/3), 216 bytes | 0 bytes/s,done.
Total 3 (delta 0), reused 0 (delta 0)
To git@10.0.0.10:root/chen.git
 * [newbranch]      master -> master
分支 master 設置為跟蹤來自 origin 的遠程分支 master。

成功
參考文檔:
https://docs.gitlab.com/ce/install/database_mysql.html
https://docs.gitlab.com/omnibus/settings/database.html#seed-the-database-fresh-installs-only
http://shaonian.blog.51cto.com/2975261/1894664
分享文章:Centos7下Gitlab遷移數據庫mysql過程
本文來源:http://m.newbst.com/article38/gpjdsp.html
成都網站建設公司_創新互聯,為您提供外貿建站、微信公眾號、App開發、網頁設計公司、做網站、響應式網站
聲明:本網站發布的內容(圖片、視頻和文字)以用戶投稿、用戶轉載內容為主,如果涉及侵權請盡快告知,我們將會在第一時間刪除。文章觀點不代表本網站立場,如需處理請聯系客服。電話:028-86922220;郵箱:631063699@qq.com。內容未經允許不得轉載,或轉載時需注明來源: 創新互聯

- 微信公眾平臺數據接口正式對所有認證公眾號開放 2016-09-04
- 企業網站制作做成怎樣才有特色 2014-01-28
- 創新互聯建站:建站公司如何有效的競爭力 2015-10-28
- 如何搭建積分商城網站 2016-10-17
- 手機網站中面包屑導航是否有存在的必要? 2016-08-20
- 大型門戶平臺類網站維護套餐 2013-10-28
- 網站改版如何把風險值降低到最小? 2016-09-28
- 網站制作中如何提升企業網站在同行中的優勢 2014-08-01
- 專業網站建設公司是如何進行網站維護的 2015-02-16
- 從事用戶體驗的必須具備的條件 2015-09-01
- SEOer做關鍵詞優化有哪些網站維護工作? 2023-04-26
- 做網站的公司幫企業進行網站維護主要做什么工作 2014-07-05